|
|
|
Terrain placement, in my opinion, really can be used offensively (to get yourself an advantage directly) or defensively (to deny an opponents advantage direclty). Offensive placement is pretty well understood by most players ... place a tile where you can easily reach to gain assault points. However, the defensive and indirect offensive moves are where you can really score big as most players aren't watching for this.
Remember, most of these are little tricks ... and they certainly aren't useful in all situations. But, if you see these you can watch for them or maybe adapt them to your own style.
And let's be clear on one thing with tournament play ... whoever is ahead on points and has the points advantage gains a huge influence over the flow of the game. If one player can score more tile points than the other or one player can hurt the opponent at range then that player has the advantage. These matches are won on time and points - not always on total annhilation of the enemy warband. All of the current formats either stress tile points (Assault, Plunder) or give some advantage to ranged bands (Cave of Pain).
And finally, I'm not the top player in the World. Heck I'm not the top player in North America, the US and probably not even the top player in my state. My actual sanctioned-tournament experience is limited. These are my opinions, built on my experiences and evaluation. As with all things in life, I could be completely and horribly wrong and apologize in advance if that is the case. If I am wrong though, do me a favor and educate me ... I'm always willing to learn more.
The better players will probably read this and have a chuckle to themselves, knowing that I'm only a bit above average at best. They should remain confident in their abilities to beat me ...
------------------------------------------------
Let's start with one that has been discussed on MaxMinis ...
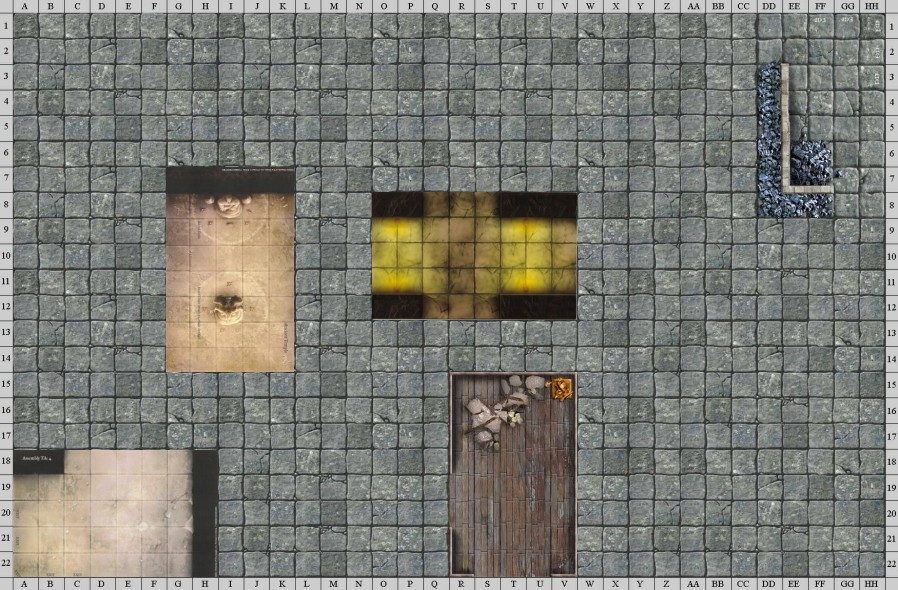
This is Dagni's defensive trick to deny his opponent easy tile points in assault and plunder. If you're using an assembly tile with a hard short edge and you get to place first you can make it so that your opponent can only score using your Treasure Room ... provided of course your opponent only brought tiles with hard edges. This trick works with any tile of yours that has hard corners basically, but the Treasure Room is just an easier place to protect and hide. If your sides are somewhat soft (Hall of Heroes, Intersection, Torture Chamber, etc.) the someone could potentially sneak in something. As long as they are using things like the Medusa's Chamber, Torture Chamber, etc. though they will be screwed. Mind you if they've got a Musrhoom Tangle, Creeping Tangle or Ancient Temple they aren't going to have much difficulty.
Incidentially, this also gives you reasonable cover from the first-turn fireball (provided you are careful in what you are doing).
You're likely going to end up with a number of tiles straddling the mid-line plus a bunch on your opponents side for you to score ...
----------------------------------------------
I'm not sure this needs to be done in detail but I have seen folks do this in tournaments. Here goes:
WHEN YOU PUT A CREATURE IN CAVE SETUP MAKE SURE YOUR OPPONENT CAN'T REACH YOU BY MOVEMENT IN ONE TURN OR GET LINE OF SIGHT ON YOUR CREATURE EASILY FOR RANGED ATTACKS.
LE got a huge boost in the tourney scene with the Mongrelfolk. In any event if you can get up on points early you dictate the future flow of the game ... you can sit back, get your charges all lined up, buff your dudes, whatever. If used properly the Mongrelfolk can guarantee first turn tile points and be reasonably successful on the following turns. But you need to be careful or you'll end up with a dead Mongrelfolk rather quickly. This next bit shows a bit of offensive and defensive setup strategy.
The basic setup is this. LE player puts the Spike Stones Cave deep across the field and puts a Cave-Setup Mongrelfolk in the little nook where the AAA Mongrelfolk is sitting. Now, the nice thing is that if you're playing LE and your opponent doesn't have anyone that moves faster than 10, that Mongrelfolk is safe for a round, guaranteed ... they can't even base you. I've seen this done numberous times. You've got him hidden from LOS and he's going to be earning you points every round.
Incidentally, Spike Stones seems to be the most used tile for this ... probably because of the spikes themselves and the deterrant they represent. More on that later.
And since you can move around, you can make make it painful for that wolf to get to you with impunity on round two ... you can set it up so that the wolf, in order to attack you, will be in LOS with another of your units way back near your assembly and guarantee you can thwack him with a Gauth's eye ray or similar. All in all, this is a fairly safe play for LE. Sure, you'd consider something different if your opponent was fielding a Green Dragon or something ultra-fast ... but if they want to take out a 3 point mongrel folk with a 28 point dragon you're still probably going to come out ahead. That's 21 squares to the focus point ... speed 10 won't cut it.
The important thing here is you want to setup in most cases where the AAA Mongrelfolk is. You do not want to be where the BBB Mongrelfolk is or where the skull-and-crossbones is.Both of those locations CAN be reached in one turn by a speed 10 opponent.
But folks, don't forget incorporeal. That Cursed Spirit can reach your Mongrelfolk on the first turn and is a virtual lock to kill him on the second round. You have to be good about remembering incorporeal, or that's a dead Mongrelfolk quickly. Once that happens, you start lagging behind on points and then your opponent controls the game. And the spirit doesn't have to go all the way to the focus point in the picture - he can stay hidden from your LOS as well. I learned this the painful way from a FIRST TIME PLAYER ... and it really taught me to be a bit more careful about cave setup. Where you ideally want to land is on the skull-n-crossbones ... and that's a virtual lock on a dead Mongrelfolk next round (or at least darn good odds).
To some this may be simplistic, to others maybe it is earth shattering. Play someone who knows what they are doing and they will make you pay. The importance of being able to base the Mongrelfolk on the first turn all has to do with later-round play. You probably can't kill it in on the first round (unless you were going to burn a GMA on a 10 speed wolf and get lucky) but if you can base it you can potentially kill the Mongrelfolk at the beginning of your next turn ... then you move away after the attack and into the battle as a whole. If you can not base the Mongrelfolk on the first turn it's going to take you two complete rounds at a minimum to get rid of him. That's going to tie up one of your figs for three rounds ... two to kill off the guy and one more to move back into the fray. On the other hand, if the Mongrelfolk is setup poorly it only takes you a turn or so to get rid of him. If it takes three it probably isn't worth it (probably ... each game is / can be different of course).
So, watch Cave Setup carefully.

It's so tempting to put your guy back there in the corner, but really there aren't alot of good places for him to really sit and be safe for a number of rounds. Both of the skull-n-crossbones locations can be hit EASILY ... AAA by ranged attacker AAA (represented by the Graycloak) WITHOUT EVEN MOVING and BBB by the BBB attacker with a single move of 6. There is no safe space on this tile in the corner when oriented this way. Period.
You get the picture. I'm not going to go over all of the other possible Cave Setup options based on tile rotation and placement in the corner. Get a map out and spin those tiles around. Count out the spaces. Blood Rock Cave has some nice options and if you get it out and play around you can see a bit why. Just remember when you place your tiles take into consideration your opponents fast creatures and ranged attackers.
-----------------------------------------------
Now let's talk line of sight. LOS, as it is commonly abbreviated, is vital to quite a few warband types. Really, there are very few specific warband and unit types.
Each has specific needs in the terrain department. Some bands are mixed composition, some are more pure and that can change things just a bit. In general, the slow melee folks want to avoid LOS as much as possible ... while they advance they could be subject to 3 or more rounds of ranged attacks. The fast meleers want to avoid huge LOS problems but aren't going to be shot to pieces quite as much as the slow meleers. Ranged attackers want lots of LOS corridors.
When you're fighting two bands of equal composition melee vs melee LOS issues aren't as important. Sure you need to keep LOS to your commanders open but really the importance of LOS comes into play when ranged units and warbands take the field and that's the perspective I'm taking here. Much of what I say is going to be biased here because I ALWAYS play bands that have some ability to threaten at range and ALWAYS have at least two good ways to grab tile points.
So, general strategies ...
In general you want to have tiles that are flexible and allow you to do any of these (scoring placement, denial of scoring placement, LOS providing and LOS blocking) in a combination to frustrate whatever band you're facing in a tournament. This means well-rounded and multi-purpose tiles. One round you could be facing a horde of fast orcs, the next a dual-HEBI build ... and you've only got one set of tiles to use.
I run alot of ranged builds, so the following is slanted from that perspective. Just consider that when you read these.
In my CG mixed Archer / Beater builds (both 100 and 200 points) I use very similar tiles. I switch things out on occasion but tend to look for the following:
For some builds I tank up on Blood Rock / Abbatoir for the sheer enjoyment of crits. For cave setup I'll include one, maybe two cave tiles (but usually just one). But, most commonly this is Rubble Assembly, Ancient Temple, Medusa's Chamber and Intersection.
Now here are some of the things I do with them.

If you win initiative and you feel like placing an assault-target tile first, so be it. Doing this you can probably guarantee yourself at least one tiles worth of points. Treasure Room, Corridor, etc. ... basically any tile you can setup where you've got a straight shot to scoring points in a protected position. This is an offensive move that puts you in a position to GAIN tile points. This kind of scenario works best for Assault formats.
We should bring this one up again. This is a defensive placement which limits an opponent who has brought only tiles with hard corners / edges from being able to score any points except in your Treasure Room of doom.
Incidentialy, I always bring one tile with at least one soft side / two soft corners. This is one reason WHY. I don't want to be blocked and railroaded. If we take a look at Dagni's placement again you can see it clearly ONLY WORKS if your opponent has only hard corners. As you can see, there's TONS of value in having one tile w/ a soft corner or two ...
By using the Treasure Room on his own side Dagni basically denies the opponent scoring tiles. I've used a similar tactic loads of times (and I'm sure I'm not the only one) to open up the opponents half of the map for LOS attacks. The concept is the same ... by placing the hard-corners Intersection in the right spot you open up huge lanes on the map where your opponent can't place any tiles with hard corners and/or edges. Sure he can place a Mushroom Tangle ... but who is that really helping?
You can see how few hiding places there actually are on the Intersection tile. With the hard corners it also blocks someone from putting too many tiles near it. I this picture I've put it on the opponents side denying any cover on his end of the map in the same spot Dagni used to deny assault/plunder tiles.
In practice I'd probably be straddling the mid-line 6-squares off the opponent's long edge to keep the center area more open instead of burying it deep in the opponents zone.
What everyone knows is that tiles can be used to open up LOS ... but good placement of tiles can BLOCK other tile placements and actually keep more LOS lines open.
So, you're opponent wants to score some assault points with his treasure room. Fine. Let him. If you're running an archer band you can pin his butt down good. I prefer the Intersection and either the Ancient Temple, Aftermath or Creeping Tangle. The intersection is all corners with lots of open space ... and the other two have basically one hard edge (two corners) and can be used ot clear space. You've taken the center with your intersection (and we've already seen how many lines of sight run through that thing. He plops down his Treasure room and then you throw open a great expanse of his side of the map with your second tile. That hard edge offers a clear border ... you can sneak tiles down on the top side for your own point scoring and you've got plenty of nice clear lines to snipe with archers and shell with spellcasters / gauths / whatever. Maybe some of their guys can get into the Treasure Room ... but you'll have some decent shots at the remainder.
He can't stay in there forever ... and you probably scored a few hits on his mad dash into his sanctuary.
I tend to favor the Ancient Temple with archer bands ... and the reason is flexibility to give my Graycloaks a magic circle if I need it. If I'm running a Gauth or spellcasters I'd use Aftermath or Creeping Tangle.
This is, incidentally, one of the ways why non-LSD LG bands get torn up at range. You can, with a bit of luck and practice, keep alot of the board clear.
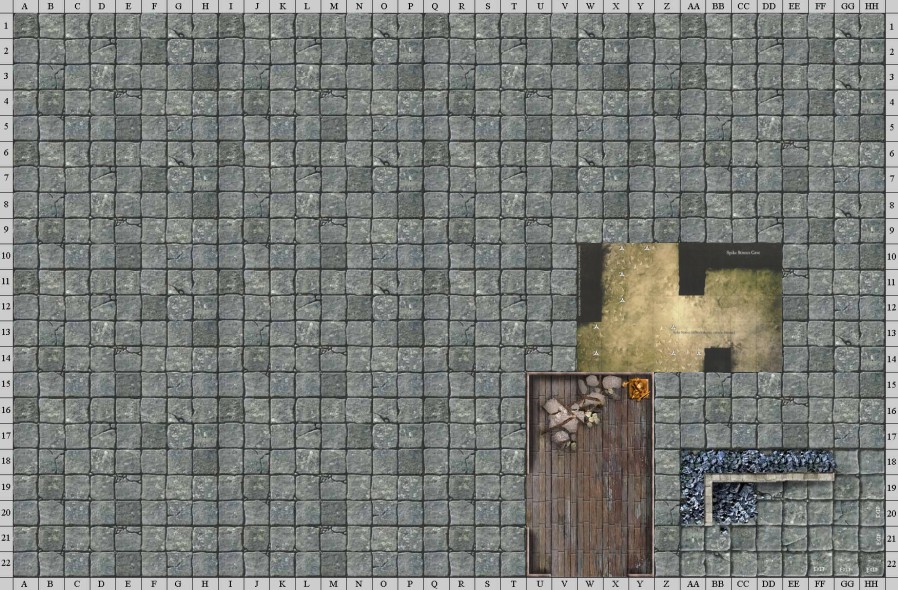
Fry mentioned this on MaxMinis. Give it a try sometime when you're not too worried about tile points and want to really mess with your opponent. This funnels all of their units in a single direction ... at least if they want to avoid damage on the spiked stones. There are a few other options for placement but you get the general idea.